- Before we get started
- Extract Software Files
- Create an Exclusion inside Windows Security
- Activation
- Set the Browser Language
- Name Your Project
- Decide what to scrape: Own Website List vs. Search Engines
- Keyword Scraper Tool
- Scraping Settings – Proxies and VPN
- Scraping Settings – Threads
- Scraping Settings – Captcha Solving
- Scraping Settings – Speed and Total Results
- Scraping Settings – Domain and Content Filters for relevancy
- Scraping Settings – Output Folder Location and Logins
- Auto Restart the Software
- Email List Cleaner – Post-Scraping Email List Cleaning
- Updating Scraped Databases
- Useful Tools
Before we get started
Note: The software will only work on the Windows Operating system. We recommend that you buy a powerful VPS/dedicated server with a good internet connection.
Extract Software Files
To extract .rar files, you’ll need a file archiver utility that supports the RAR format, such as WinRAR, 7-Zip, or WinZip. Here’s how you can extract .rar files using WinRAR as an example:
Using WinRAR:
- Download and Install WinRAR:
- If you don’t have WinRAR installed, you can download it from the official website and install it on your computer.
- Locate the .rar File:
- Find the .rar file that you want to extract. It should be saved on your computer.
- Right-click on the .rar File:
- Right-click on the .rar file to open the context menu.
- Choose “Extract Here” or “Extract to [Folder Name]”:
- Select either “Extract Here” if you want to extract the files in the same location as the .rar file, or choose “Extract to [Folder Name]” to specify a destination folder.
- Wait for Extraction:
- WinRAR will start extracting the contents of the .rar file to the specified location. The time it takes depends on the size of the archive.
- Access the Extracted Files:
- Once the extraction process is complete, you can access the extracted files in the destination folder you specified.
That’s it! You have successfully extracted the contents of a .rar file using WinRAR. If you’re using a different archiver like 7-Zip or WinZip, the process is similar. Simply right-click the .rar file and look for options to extract or extract to a specific folder.
Create an Exclusion inside Windows Security
To add a software to the exceptions list in Windows Defender on Windows 10, you can follow these steps:
Open Windows Security:
Click on the Windows “Start” button and select “Settings” (the gear-shaped icon).
In the Settings window, select “Update & Security.”
Access Windows Security:
In the Update & Security window, select “Windows Security” from the left sidebar.
Open Virus & Threat Protection:
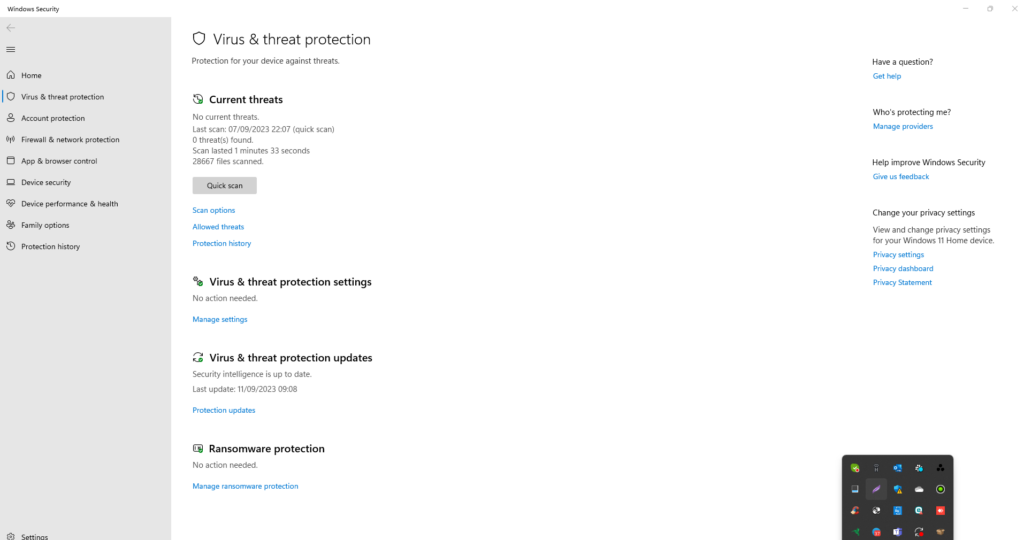
In the Windows Security window, click on “Virus & Threat Protection.”
Manage Settings:
Under Virus & Threat Protection Settings, click on “Manage Settings” under the “Virus & Threat Protection” section.
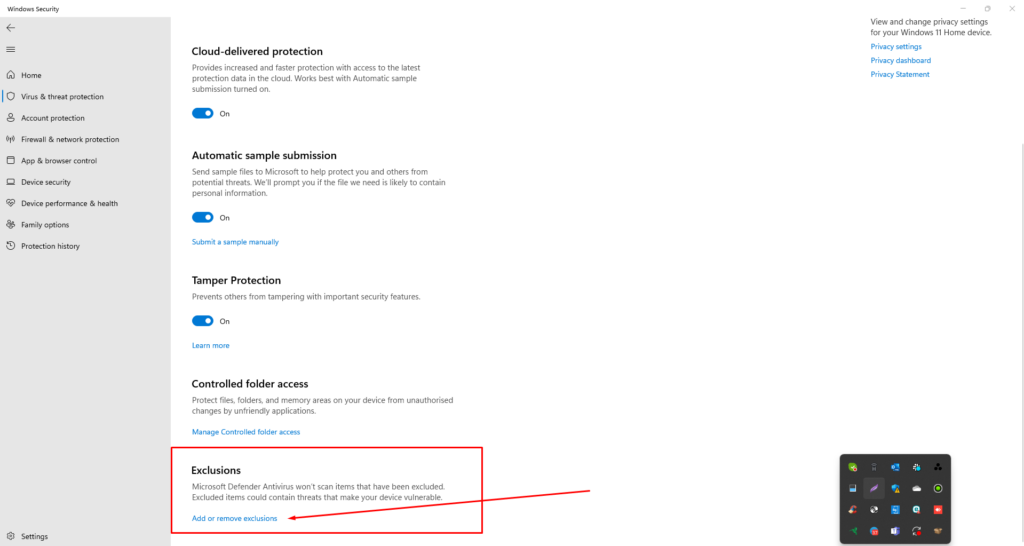
Add or Remove Exclusions:
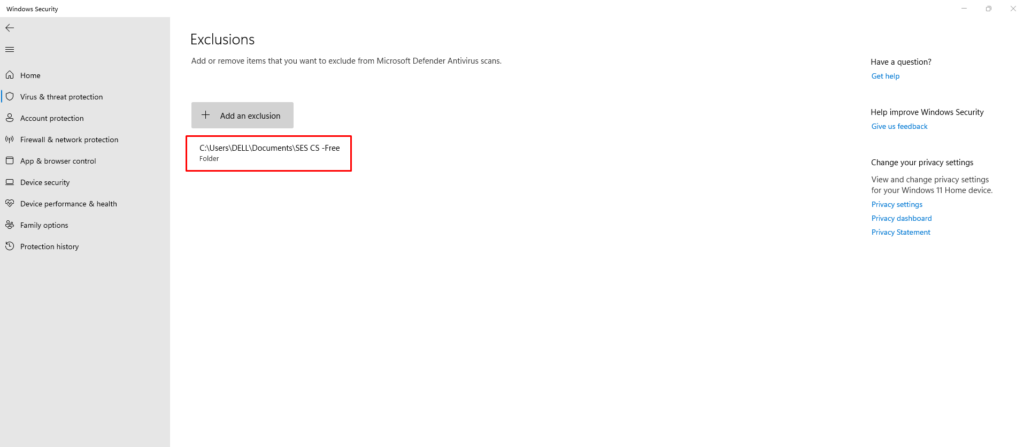
In the Virus & Threat Protection Settings window, scroll down to the “Exclusions” section.
Click on “Add or remove exclusions.”
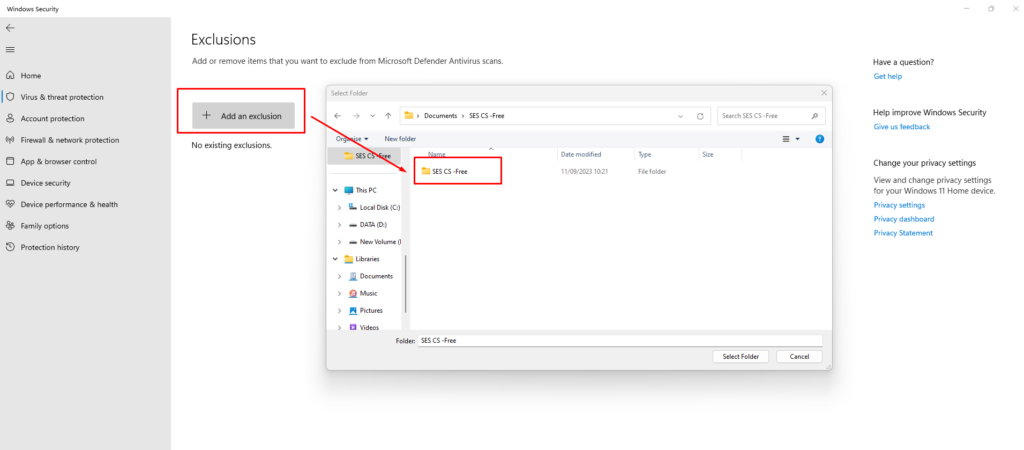
Add an Exclusion:
Click on “Add an exclusion,” then choose the type of exclusion you want to add. You can select from “File,” “Folder,” “File Type,” or “Process.”
Browse for the Software:
If you chose “File” or “Folder,” browse your system to locate and select the file or folder related to the software you want to exclude.
Confirm the Exclusion:
Once you’ve selected the file, folder, or process, click “Open” or “Add.”
The software or item will be added to the exceptions list, and Windows Defender will no longer scan it.
Complete the Process:
Close the Windows Security window, and your chosen software will now be excluded from Windows Defender scans.
Activation
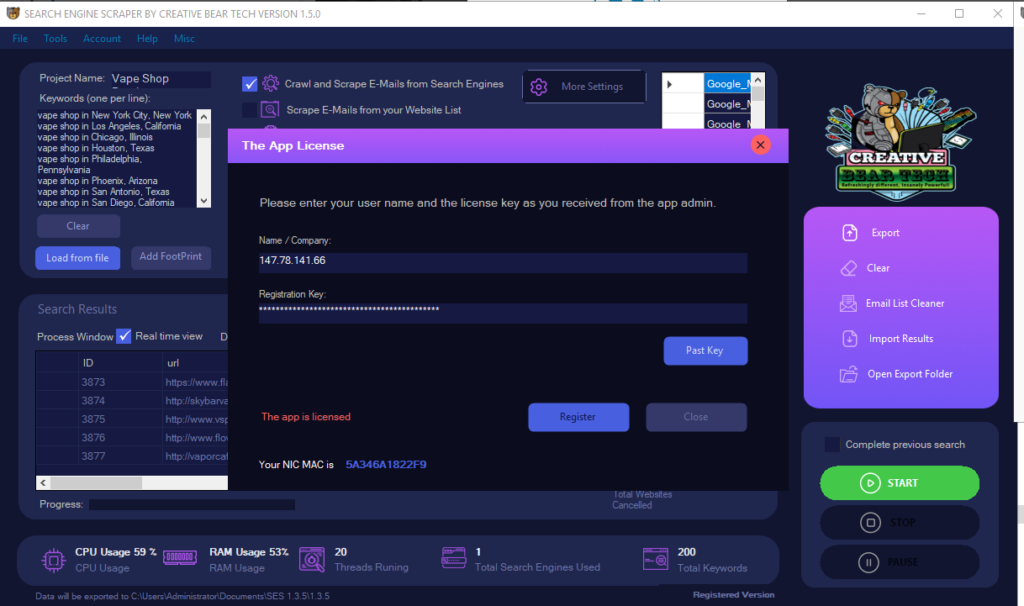
The first thing you will need to do is to activate the software. A licence key should have been sent to you upon purchase. Make sure to use the same company name/username and licence key that you have received.
Set the Browser Language
Unless you are using an IP address of a country that speaks English i.e. USA, UK, Australia, Ireland, etc. the results can sometimes be saved according to the geo location of the IP address. To avoid this and have the results presented in English irrespective of the geo location of the IP address, go to Tools -> Open App Browser -> you will see that Google may suggest to switch to English (in case you are using an IP address that has a non-English speaking geo location such as Russia, UAE, Turkey, China, India, etc). Simply select switch to English and all the results should now be presented in English.
Name Your Project
First, you will need to name your project. A separate folder with your project name will be created inside the output folder.
Decide what to scrape: Own Website List vs. Search Engines
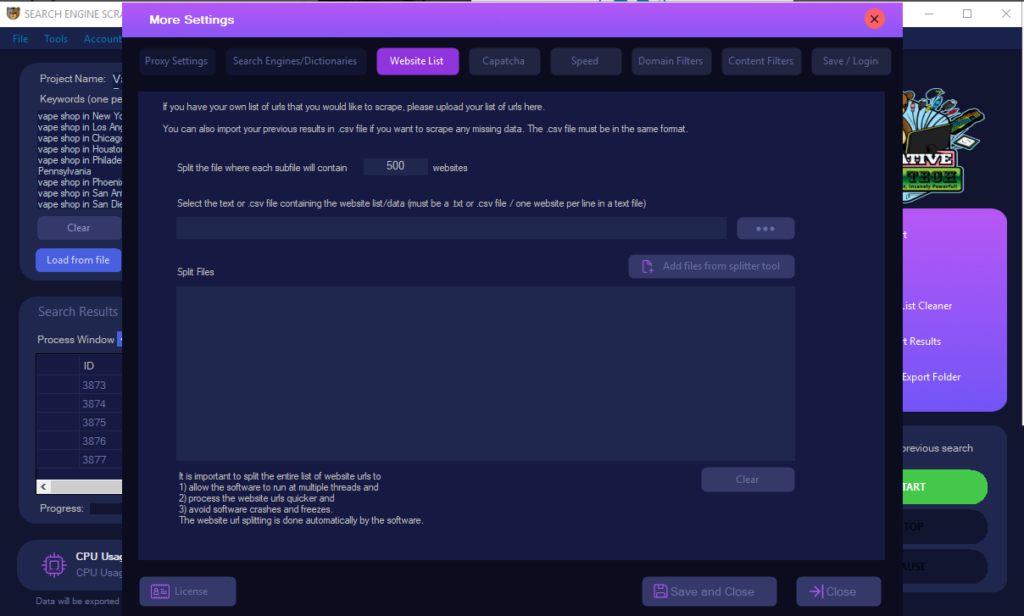
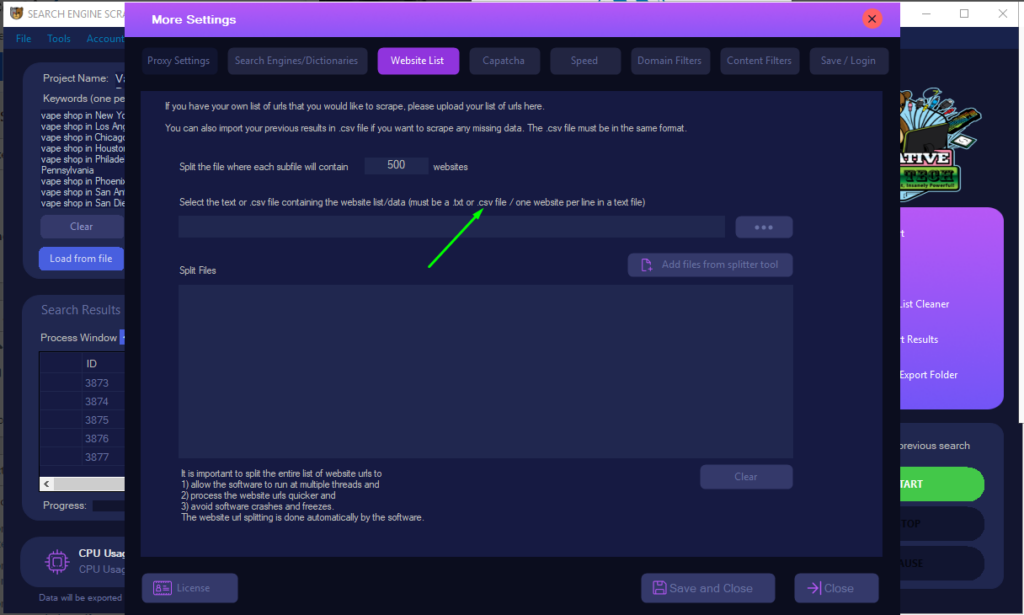
Scraping your own Website List
If you have your own list of urls you would like to scrape, simply save them to a notepad text file with one url per line and upload it inside the “website list” tab inside the settings. The scraper will then scrape your websites for business contact details. Inside the main GUI, tick “scrape E-Mails from your website list”.
Scraping Search Engines using Keywords
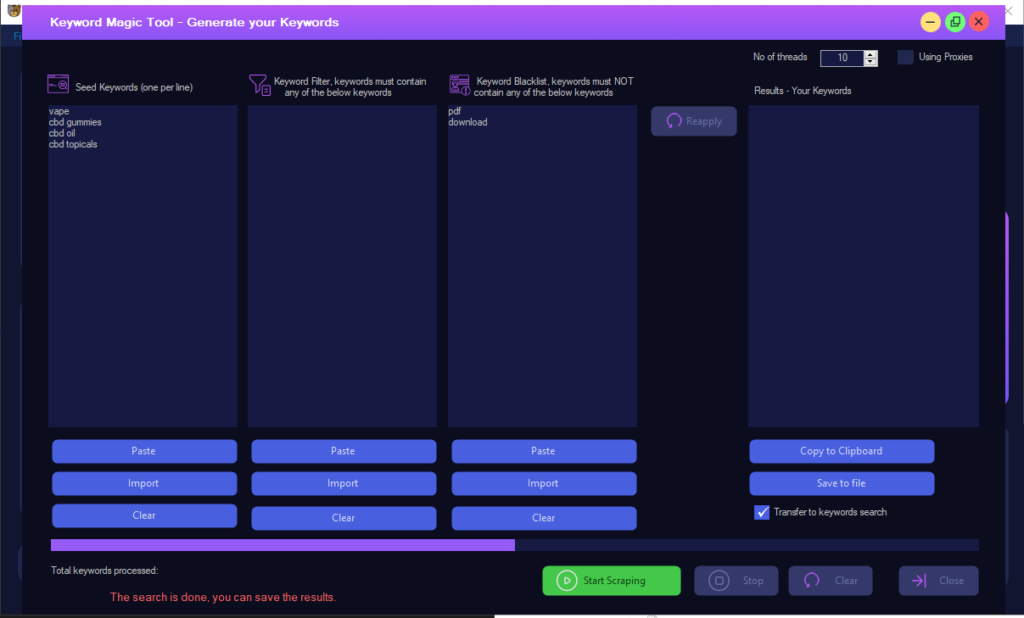
If you would like to scrape business leads using your set of keywords, you will need to check “crawl and scrape e-mails from search engines” box on the main GUI. Then, you will need to add your keywords inside the keywords box on the left hand side of the main GUI. If you do not have a set of keywords, you can use our keyword generator to scrape keywords. On the main GUI, go to Tools -> keywords magic tool. You should then enter your seed/main keywords. Then you can enter the keywords that your list must contain and the keywords that it must not contain. For example, if I am scraping for CBD Gummies or CBD Oil, then I will want for my keywords to contain the keywords CBD, Hemp, Cannabidiol and I would not want them to contain keywords such as “Amazon”. Then select the total number of threads for scraping keywords and hit the start button.
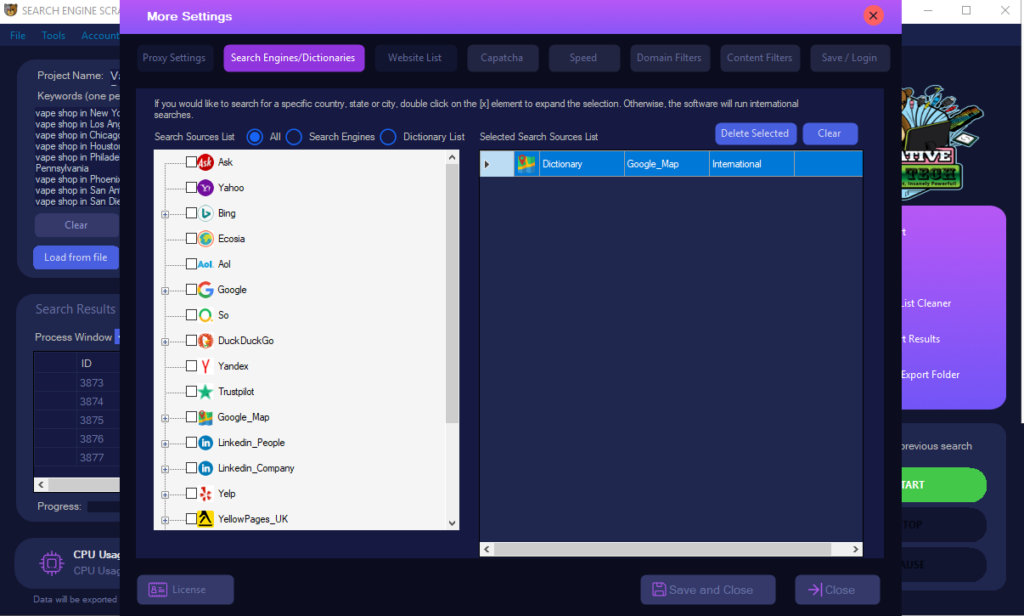
Now that you have your keywords, you will need to choose the platforms you would like to scrape. Go to Settings -> Search Engines/Directories -> select the platforms you would like to scrape. Click on Save. The email crawler will merge all results into a single database file.
Keyword Scraper Tool
You can use the keyword magic tool to scrape keywords. You simply need to enter your root keywords (base keywords) and the keyword scraper tool will scrape all the related keywords. Be sure to have a careful think about your keywords as those will determine the quality of the results scraped.
Scraping Settings – Proxies and VPN
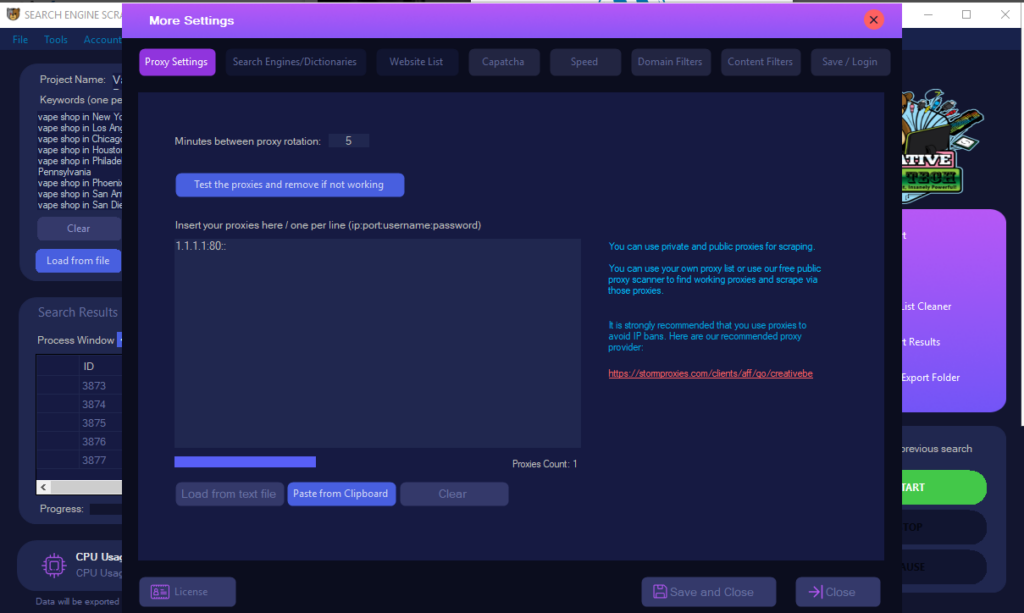
Now that you have configured your main project settings, you will need to configure the scraping settings. You can use your own list of proxies to avoid IP bans. Check the “use proxies” box on the main gui and go to settings -> proxies and upload your proxies. They can either be authenticated, in which case you enter your proxies in IP:PORT format or IP:PORT:USER:PASSWORD. You should then test your proxies. If you would like to use a VPN with timed out IP change, select “use an integrated web browser instead of http request”. We recommend that you do not use too many threads whilst using a VPN.
Scraping Settings – Threads
You can enable “fast mode” where You will need to set the total number of threads you want to use. More threads means that you will need more proxies and a powerful computer as scraping is very resource intensive. More threads means faster scraping. If you do not have proxies and are using your local IP address, do not enable this mode as your IP will get banned in no time.
Scraping Settings – Captcha Solving
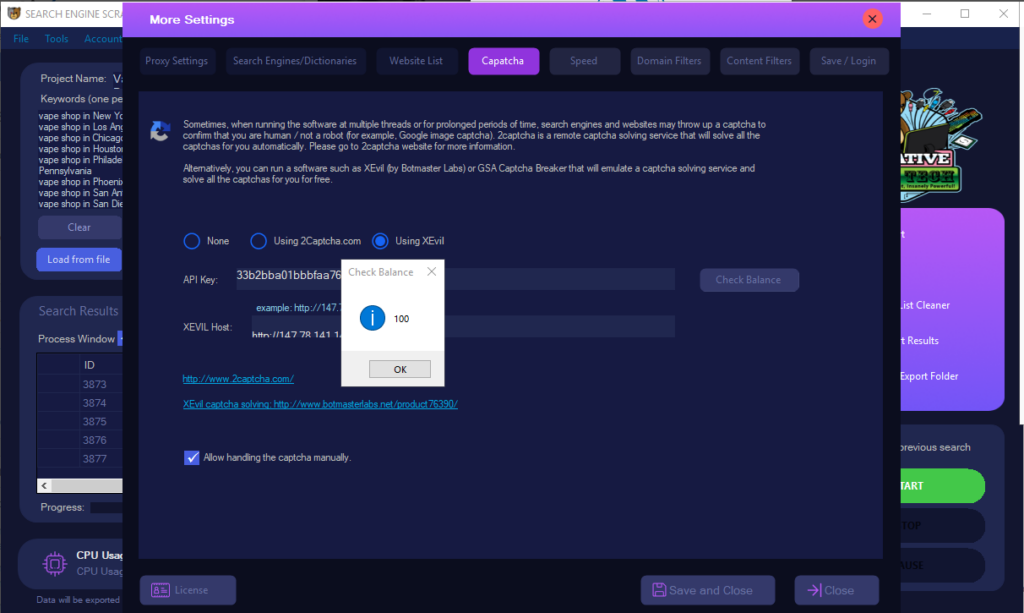
We recommend that you use 2captcha to solve captchas as these are likely to come up whilst scraping. You can also use XEVIL free captcha solving to route all your captcha requests and solve captchas for free.
Scraping Settings – Speed and Total Results
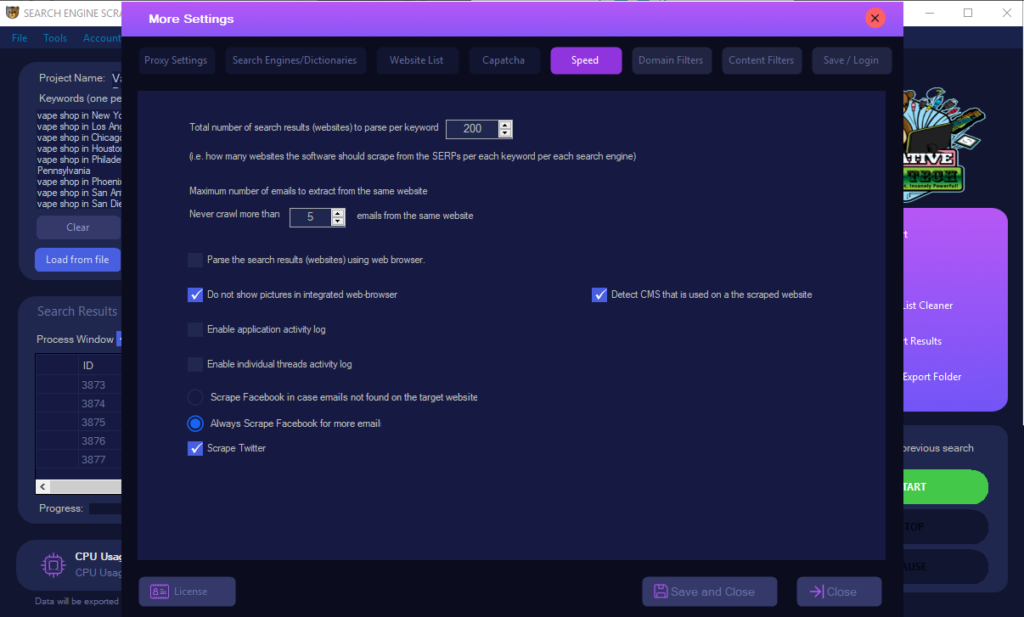
Inside the settings -> speed tab, you will need to configure how many results to scrape per keyword and the maximum number of emails to extract from each website. We recommend that you enable always scrape facebook and twitter.
Scraping Settings – Domain and Content Filters for relevancy
Domain Filters
Inside settings -> domain filters, you can set the keywords that the target websites should not or should contain inside the url. You can also skip the scraping of subdomain sites.
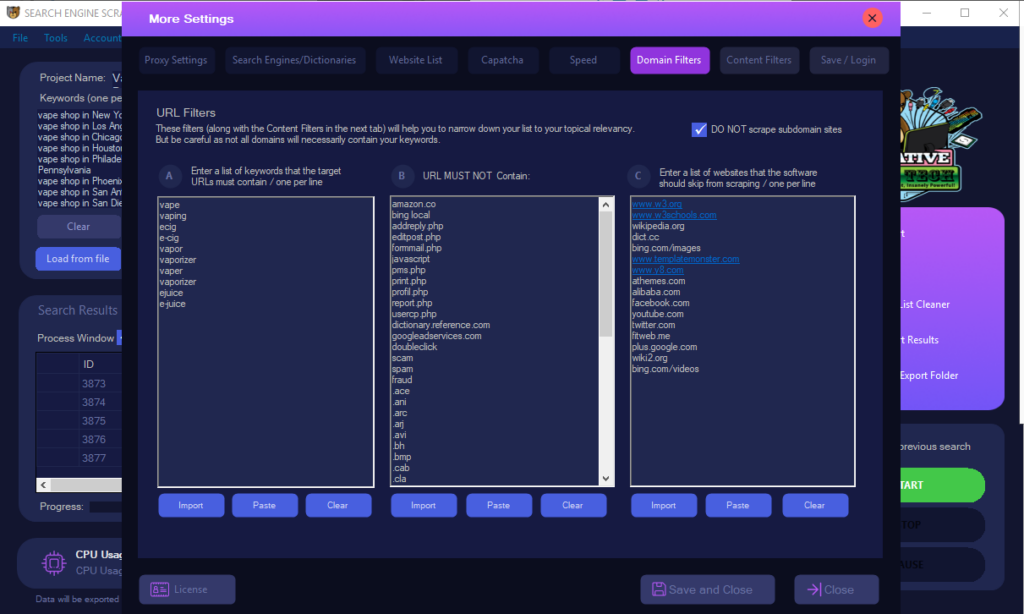
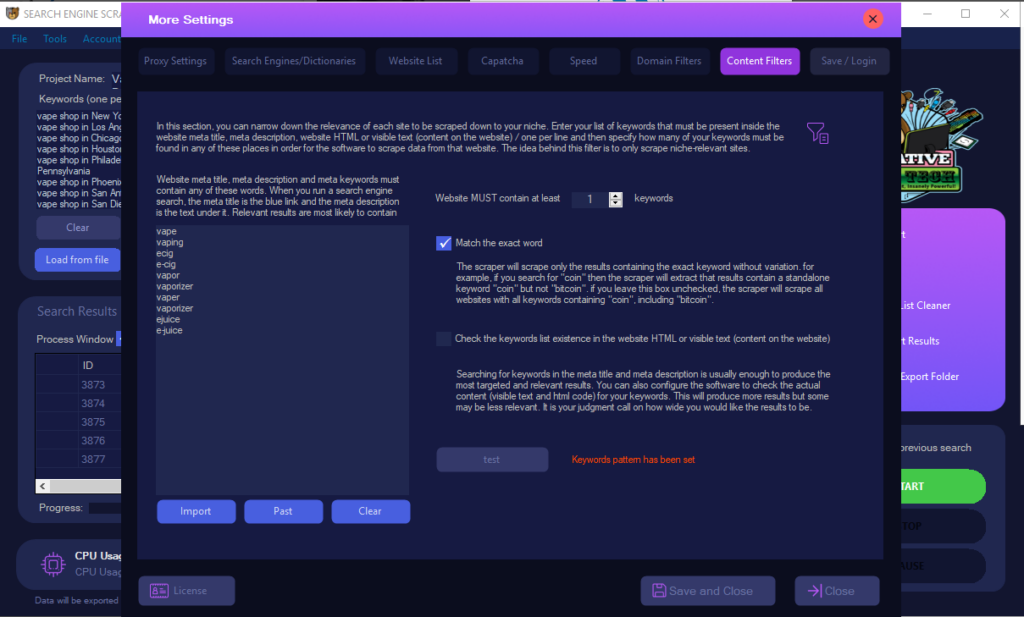
Content Filters
Inside settings -> content filters, you can add your keywords that must be present inside the meta titles and meta descriptions of target websites. This helps to filter out more relevant results. You can also filter out sites that contain your keywords inside the html/body content but this filter will be less accurate and may produce less relevant results.
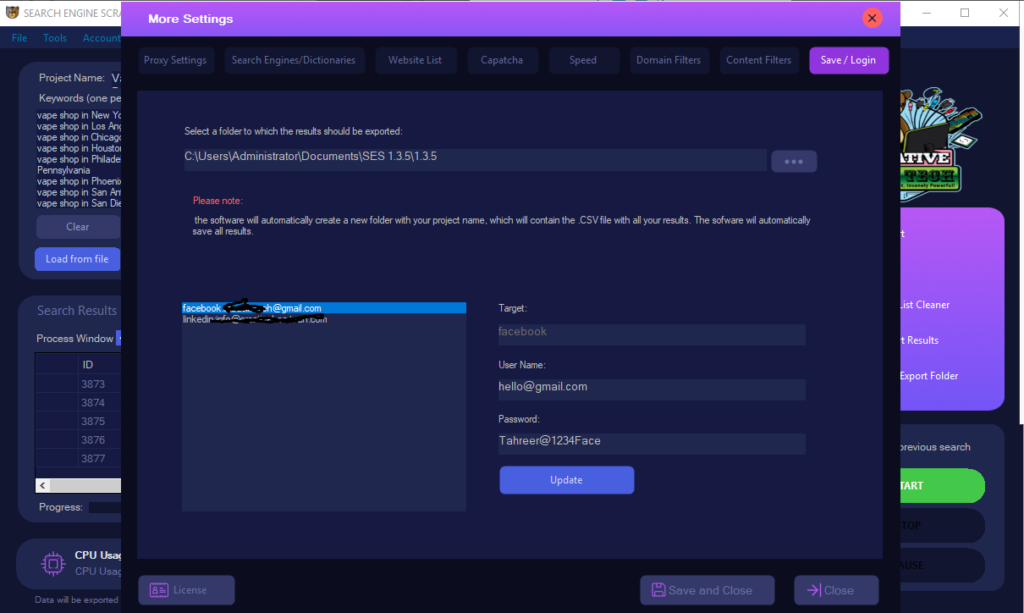
Scraping Settings – Output Folder Location and Logins
Inside the “save/login” tab, you will need to specify where the scraped files should be saved and also enter your facebook logins for more accurate facebook scraping as facebook sometimes does not show company pages for users who are not logged in.
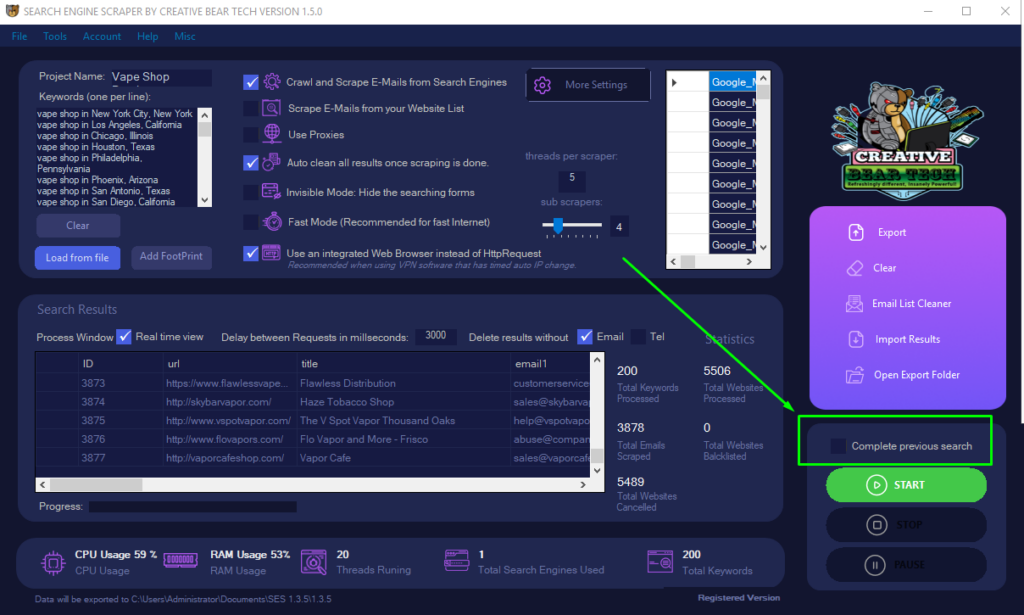
Auto Restart the Software
Before starting a project, you can enable “complete previous search” on the main GUI so that if the software crashes or closes, it will automatically restart and resume from where it left off.
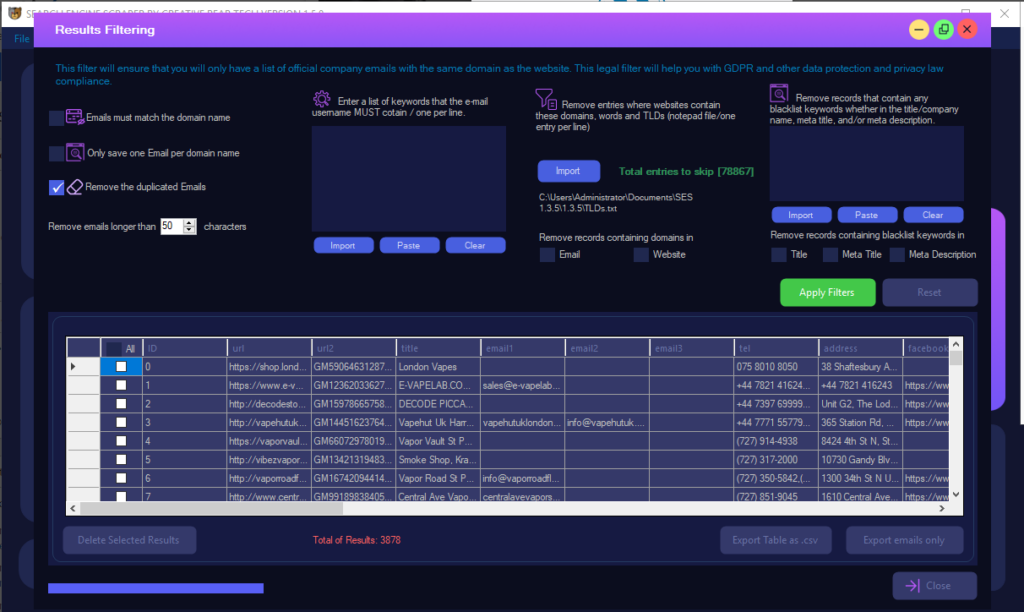
Email List Cleaner – Post-Scraping Email List Cleaning
Once you are finished with scraping, you can run the email list cleaner. You can filter emails by username, domain, TLDs, meta titles and descriptions. You can also upload an entire list of domains that you would like to have removed from the results. For example, you may want to remove majestic million websites (you can download an up-to-date list from their website) as those will be sites that you may not be interested in targeting.
Updating Scraped Databases
Adding more records
If you already have a scraped database (scraped with our software), you can upload it and scrape on top of it so that you do not have to start from scratch. This helps to keep your database up to date.
Updating existing records
If you would like to update ALL records inside an existing database (not scrape new ones) then you will need to upload your database inside settings -> website list. The software will scrape and update all existing records.
Useful Tools
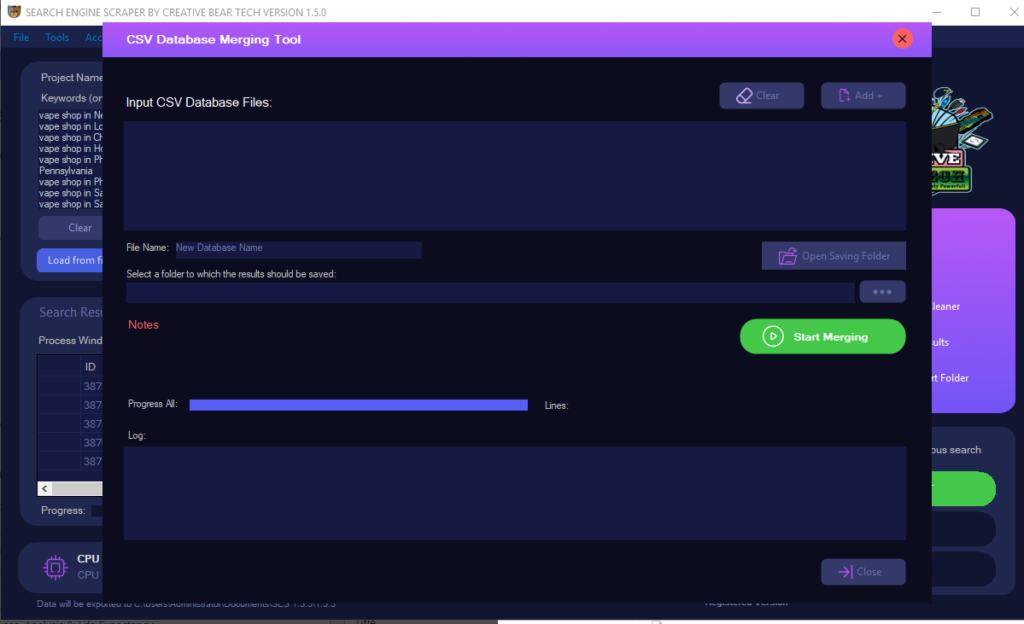
Tools -> CSV Database Merging Tool
Use this tool if you would like to merge multiple scraped databases into one.
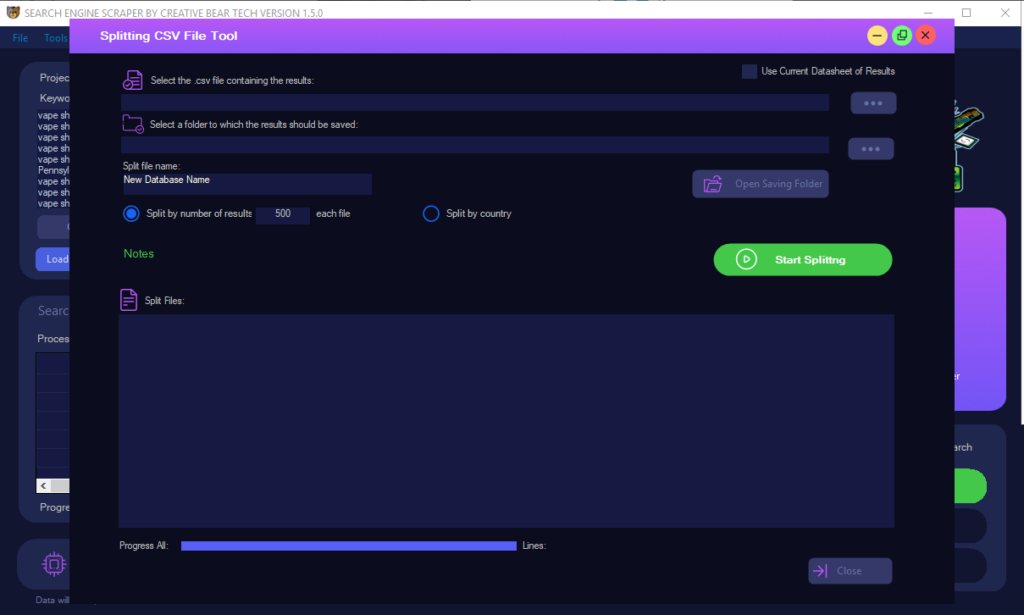
Tools -> Splitting CSV File Tool
You can split your database on a country-by-country basis or by the total number of results.
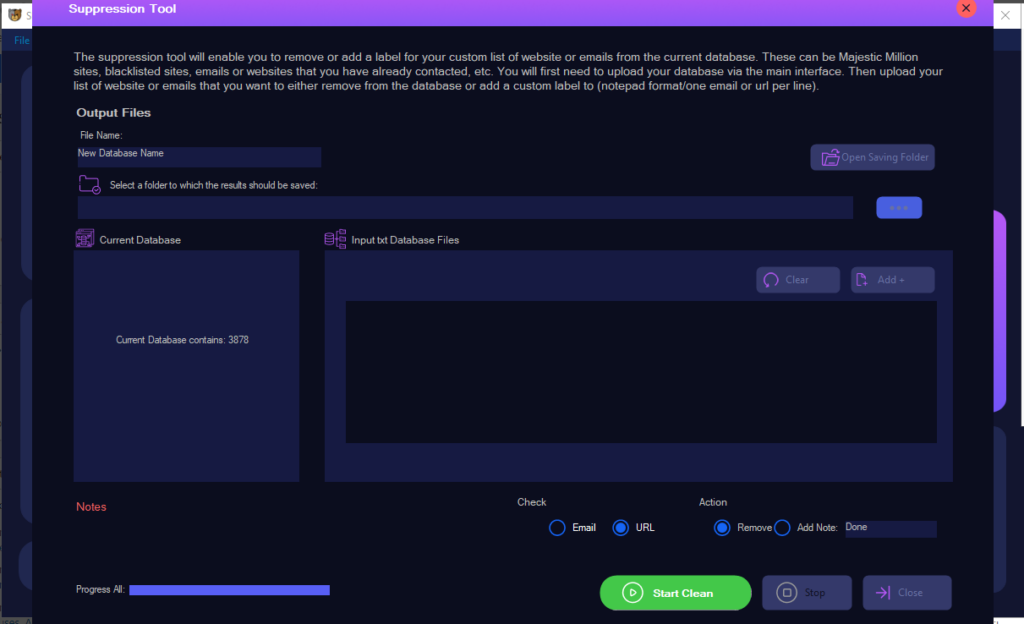
Tools -> Suppression Tool
You can use this tool to remove any records that contain any websites/emails from your website list/black list. Instead of removing, you can also add notes inside the database next to these records. For example, you can remove your existing clients from the database so that you do not contact them unnecessarily. You can also add a note next to each record. For example, if you are profiling your data and have a list of urls/emails that have already been processed/contacted, you can add a note to that extent.